Monday 27 February 2012

How to Get Back Deleted SMS in Mobiles

Get Back Deleted SMS in Mobile via Vivek Creations
Get back Deleted SMS in Mobile | Vivek Creations


In my previous posts on Mobile i have shared some interesting and useful creations like How to track your lost mobile phones And How to access Mobile sites on PC etc..
So, today i am going to share another useful creation of Vivek Creations.
How you can recover your Deleted SMS in mobile phones. Don't forget everything is possible just you have to find a on track :)
Ok lets start this post..

Things you will need :

1. A Nokia Mobile supporting application download.
2. Second search for any File-Manager like ( FExplorer, Fileman or any other )
3. Install that application on your cellphone.
4. Now when everything is ready follow the below steps:

Procedure to Read Deleted SMS in Mobile:

1. Open your File-Manager i.e.. FExplorer or Fileman

2. Select the memory card drive that can be C: or D: just check it out.

3. Now after opening drive navigate to

System > Mail

4. Now in Mail folder you will see different folders like ( 0010001_s )

5. Now the above folders are the actual messages which you are going to read, now there will be many folders which are actually all the messages now search for the one you are browsing and than do not open that directly as it will not be supported, choose the one you wanna open than choose

open > file > hex/text viewer

6. That’s it now you are reading the deleted SMS which you can copy or transfer into other phone by sending it through Bluetooth.

If you are still facing any problem regarding my this creation then you can mentioned in your comments.

Friday 17 February 2012

Facebook Auto Poke Back For Mozilla And Crome

In my previous posts related to Facebook I have posted a lot about facebook tweaking and tools, as you can check Facebook Chat Code Generator Or Fake Facebook Status Machine..

Today i am going to share an interesting post on Facebook in which i will explain about a trick on Facebook Poke Back. Means you can poke back all the peoples who poked you by just a single click. And also you can poke random peoples on facebook. I will share two paths of Facebook Poke Back trick 1st one is through Google Crome and second one is through Mozilla Firefox.
Now lets start with 1st path..

HOW TO AUTO POKE BACK IN GOOGLE CHROME

Step 1:

Open your Google Chrome browser.

Now Click here to go to ‘POKE ALL FOR CHROME’ Extension in Chrome Store and install the Extension by clicking Install button.

Facebook Auto Poke Back For Mozilla And Crome | Vivek Creations


Step 2:

After clicking Install, you can see the Installed conformation message in your browser top right side. Now the Extension is Installed.

Now you have to configure the Extension. You can see the Extension FACEBOOK ICON in the Top right side of the browser, Click on it and Check the option ‘AUTO POKE’. (Screenshot below)

Facebook Auto Poke Back For Mozilla And Crome | Vivek Creations

Step 3:

Thats all, all done.
Now lets check it.
Ask any of your friend to poke you and Refresh the page or nagivate to some other page in facebook to get poke notification. After that you can see the message in the poke notification area that Auto poked with your Friend name who poked you. Example shown below


Facebook Auto Poke Back For Mozilla And Crome | Vivek Creations

If the Extension not working, Clear the Cache and Restart the Browser to try again. Any problem ask help in comments.

I hope you understand our 1st path of Facebook auto poke back trick. Now Lets take a look on How to do the same with Mozilla Firefox.

HOW TO AUTO POKE BACK IN MOZILLA FIREFOX

In Mozilla Firefox you have to install Grease Monkey add-On before we install FACEBOOK AUTO POKE script.
If you already installed Grease Monkey add-on in your Firefox browser, then you can skip this step and go to Script Installation step.

Step 1: Click Here to install Grease Monkey


Step 2: (Installing Facebook Auto Poke Script)
After installing Greasemonkey Addon, you should restart the browser to take effect and now Click here and go to ‘FACEBOOK AUTOPOKE SCRIPT’ page and Click ‘INSTALL’ button which is located in the Top right corner of the website.

Facebook Auto Poke Back For Mozilla And Crome | Vivek Creations

Now the Installer popup will come, Click ‘INSTALL’  in that popup box.

Facebook Auto Poke Back For Mozilla And Crome | Vivek Creations

After clicking ‘INSTALL’. Greasemonkey will show notification in the Bottom side corner that script is installed.

Greasemonkey notification

Now the Script Installed Correctly. Now ask Your friends to Poke you in facebook and you check your poke notification area, you can see its already poked back automatically.

Facebook Auto Poke Back For Mozilla And Crome | Vivek Creations


Thats all :)
Please mentioned your views in comments about my this creations.

Saturday 11 February 2012

How To Mount A Hard Drive Automatically During Start up In Ubuntu


How To Mount A Hard Drive Automatically During Start up In Ubuntu


I do not know how many times I will ever receive requests such as “ Hello, how can I automatically mount a hard disk boot Ubuntu? ”. Finally I managed to find some ‘time to write this article I will show you the steps necessary to ensure that, in a completely automatic, power up your Ubuntu are also mounted hard drive or hard drive you need . Let’s start with a first method , longer and more cumbersome, but you will have full control of what you are doing. Open the terminal and type:

sudo mkdir / media / namepersonaldetails

Of course replace “ namepersonaldetails ” with a name to your liking. With this command we are not doing is create a directory under / media where we will mount our hard drive.Now comes the slightly more difficult to know the name of your HD (/ dev/sda2 / dev/sda3, etc.). You can do this from a terminal type the command:

sudo fdisk-l

or the command:

df-h

Now we have to edit the fstab file is a configuration file used to indicate which and how many drives loaded at boot time, with their options. Enter, therefore, the following command:

sudo nano / etc / fstab

and, at the end of the file, add:

/ Dev/sda3 / media / namepersonaldetails ntfs auto, rw, exec, users, dmask = 000, fmask = 111, nls = utf8 0 0

As you can see it, in this case, a HD with NTFS file system. To check that the HD is really mounted, type:

sudo mount-a

Another effective method , and very fast, is to create a small startup script. Type:

gedit ~ / mount.sh

and paste the following code:

# / Bin / sh 
gvfs-mount-d / dev / sdaX

Where, of course, instead of sdaX you need to put the id of your HD. Now granted execute permissions to this script:

chmod + x ~ / mount.sh

And add it to “ boot applications ”in Ubuntu. All very simple, do not you think?


    Monday 6 February 2012

    How to speed up internet without any software | Full Tutorial

    How to speed up internet without any software | Full Tutorial

    Well in my this creation i will teach you, how to speed up your internet without any software. Its just a game of registry edit.

    Yeah you can speed up you net by this tutorial. So lets start how it works and what you need to do :)

    For Windows 2k/XP

    1. First, open the Windows Registry using Regedit, and (after backing up) navigate to:

    HKEY_LOCAL_MACHINE\SYSTEM\CurrentControlSet\Services\Tcpip\ServiceProvider

    2. Note the following lines (all hex dwords):

    Class = 008 ( biggrin.gif - indicates that TCP/IP is a name service provider, don't change
    LocalPriority = 1f3 (499) - local names cache
    HostsPriority = 1f4 (500) - the HOSTS file
    DnsPriority = 7d0 (2000) - DNS
    NetbtPriority = 7d1 (2001) - NetBT name-resolution, including WINS

    3. What we're aiming to do is increase the priority of the last 4 settings, while keeping their order. The valid range is from -32768 to +32767 and lower numbers mean higher priority compared to other services. What we're aiming at is lower numbers without going to extremes, something like what's shown below should work well ;)

    4. Change the "Priority" lines to:

    LocalPriority = 005 (5) - local names cache
    HostsPriority = 006 (6) - the HOSTS file
    DnsPriority = 007 (7) - DNS
    NetbtPriority = 008 ( biggrin.gif - NetBT name-resolution, including WINS

    5. Reboot for changes to take effect.


    For Windows 9x/ME

    1. The tweak is essentialy the same as in Windows 2000/XP, just the location in the Registry is slightly different. For a more detailed description see the Windows 2000/XP section above

    2. Open the Windows Registry using Regedit, and (after backing up) navigate to:

    HKEY_LOCAL_MACHINE\System\CurrentControlSet\Services\VxD\MSTCP\ServiceProvider

    3. You should see the following settings:
    Class=hex:08,00,00,00

    LocalPriority=hex:f3,01,00,00
    HostsPriority=hex:f4,01,00,00
    DnsPriority=hex:d0,07,00,00
    NetbtPriority=hex:d1,07,00,00

    4. The "priority" lines should be changed to:

    LocalPriority=hex:05,00,00,00
    HostsPriority=hex:06,00,00,00
    DnsPriority=hex:07,00,00,00
    NetbtPriority=hex:08,00,00,00

    5. Reboot for changes to take effect


    System.ini IRQ Tweak - Windows 9x/ME ONLY

    1. Find your Network Card's IRQ

    1. In order to add the entry to your System.ini file, you'd first have to find your NIC's IRQ

    2. Right-click on My Computer icon on your Desktop, then left-click on Properties (a shortcut for that would be to press the 'Windows' + 'Pause' keys). Navigate to Device Manager and double-click on Computer. Under "View Resources" you will find a list of IRQs, each with description of the device that's using it. Note the IRQ number used by your Network Adapter

    2. Adding the entry to System.ini

    1. Once you've found the IRQ of your Network Card, you need to reserve some RAM for its use, by adding an entry to the System.ini file. You can edit the file in any text editor, however the easiest way is to use Windows' built in "System Configuration Editor"

    2. Navigate to Start > Run and type sysedit . Find the [386enh] Section in the System.ini file and add Irq[n]=4096 under it, where [n] is the IRQ number of your NIC and 4096 is the amount of RAM you want to reserve in Kbytes. We recommend using 4096, however you can experiment with different values if you want. Save changes in the file, exit and reboot for changes to take effect.

    Note: If you choose to try different values, keep in mind that reserving too much RAM for your NIC will decrease the amount of RAM available for applications, while reserving too little might not give the desired effect. It is the one of the great creativity of Vivek Creations Now some additional thoughts.


    3. Additional Thoughts


    1. The only negative effect of the System.ini IRQ tweak is that it will reduce the amount of RAM available for running applications a bit, by reserving some specifically for your Network Card's use. The gain in performance usually outweighs the negative effect by far, considering any Computer with 32Mb of RAM or more

    2. This tweak may or may not work for you. It is not a documented tweak by Windows

    3. Keep in mind that if you add hardware to your system the IRQ of the Network Adapter might change, in which case you will need to modify the setting in System.ini

    4. In systems with multiple NICs, you might want to add the setting for both IRQs. Also, you could reserve RAM for other IRQs if you wish, just use common sense and don't forget it reduces the amount of RAM available for running applications

    5. If you are using an USB device, it does not have a specific IRQ, however you can try adding the entry using the IRQ of the USB Controller

    6. For internal Cable Modems, you'd have to add the entry using the IRQ of your modem, rather than the IRQ of a Network Card.


    RESULTS WILL VARY


    No matter how good your systems may be, they're only as effective as what you put into them. Enjoy my creations and keep yourself updated here for more interesting tutorials.
    Do you want more tutorials related to Windows or Registry ?
    If you want to read them all then simply Click Here


    How to resolve Adobe Photoshop Cs2 Data1 Cab error

    How to resolve Adobe Photoshop Cs2 Data1 Cab error


    What exactly is Adobe Photoshop Cs2 Data1 Cab error code?


    A Adobe Photoshop Cs2 Data1 Cab error is the number and letter data format of the error message prompted. This is the popular error code layout used by Windows along with other Windows compatible software and device driver manufacturers.

    This kind of computer code is required by the merchant to ascertain the error caused. This unique Adobe Photoshop Cs2 Data1 Cab error has a numeric value and a practical explanation. Sometimes the error could have extra variables in Adobe Photoshop Cs2 Data1 Cab data format .The further hexadecimal code will be the address of the memory regions where the instructions are stored at the time of the error message.

    The cause of Adobe Photoshop Cs2 Data1 Cab error?


    The Adobe Photoshop Cs2 Data1 Cab error message may be due to Windows system file damage. Broken system files are usually a real threat to the performance of your system.
    There can be numerous events which may cause file errors. An unfinished installation steup, a partial file erasure, bad erasure of applications or computer hardware. It can also be caused if the pc has caught a a virus or adware or spyware invasion or through an incorrect shutdown of the laptop or computer. Any of the previously mentioned activities may well end up in the deletion or corruption of Windows system files. A corrupted system file will lead to missing and erroneously connected data and archives necessary for the accurate working of the application.

    Guidelines on how to simply resolve Adobe Photoshop Cs2 Data1 Cab error message?


    The two main techniques to take care of Adobe Photoshop Cs2 Data1 Cab Error message:


    Advanced User Remedy (manual update):
    1) Start up the personal computer then log on as an admin.

    2) Click the Start button then select All Programs, Accessories, System, and next select System Restore.

    3) From the new window, select “Restore my personal computer to an earlier period” and after that click Next.

    4) Find the most up to date restore date in the “click a restoration point” list, then click Next.

    5) Click Next within the confirmation screen.

    6) Reboot the pc after the rescue is done.


    Beginner Remedy (completely automated):
    1) Download this (Adobe Photoshop Cs2 Data1 Cab) fix software program.

    2) Install software program and click on Scan button in the software.

    3) Hit the Repair Errors button when the scan is successfully done.

    4) Restart your computer system.

    Here is an alternative Adobe Photoshop Cs2 Data1 Cab repair tool you may use if the previous option doesn’t work.


    Sunday 5 February 2012

    Optical Calibration: DVD Player Repair


    We bought our DVD player way back when they were pretty friggin’ expensive, so naturally after we moved when it stopped working, I wasn’t about to just throw it away and buy another one. I’ve done a little bit of trial-and-error recalibration before, mainly on Sega Dreamcast consoles, so I figured I’d give it a shot.

    Note: I take no responsibility for any damages that might result from you reading this article. You might damage your DVD Player even more from trying to re-enact the steps described below. Think about that before doing it.

    The first thing you’ll want to do is open the drive tray on your DVD player. Sometimes it’s tough to get the unit apart when the tray is already all the way closed, so eject the disc, and while the tray is out, unplug the unit.

    Next, find a nice comfortable place to sit down where there’s something grounded nearby – a computer desk is fine because you can touch the metal case of a computer (assuming your PC is grounded) and discharge any static electricity that might be in your body. The MPEG decoder and encryption-related ICs inside your DVD player are very very sensitive to electrostatic discharge. I’ve had at least a couple of junk devices where I have taken the lid off, stared at it, poked one or two things, put the lid back on, and the thing’s even worse off – the only explanation I can think of is ESD.

    So ground yourself, and try not to scuff your feet on any carpet or anything while the lid’s off your DVD Player – just in case.

    Next, pop the lid off the unit and set it and all the screws aside. Locate the power supply area, and stay well away from it. While the unit is unplugged, your chances of dying from an electric shock with the residual charge still in the PSU are pretty slim – but you probably don’t want to take the chances.

    See if you can locate the lens and see it without removing anything. If you can, great – if you can’t, you might be able to get to it by moving the “eye” all the way to the end of it’s track, where it would sit while reading the outside portions of a disc. To accoplish this, look for the sprocket which is closest to the motor (furthest from the “rack” gear, or the eye) and give it a gentle turn with your finger. The eye should start moving out.

    Some DVD Players (and indeed CD players and other stuff, the GD-ROM in a Dreamcast console comes to mind) use a Worm gear instead of a few gears and a rack. On those, you really don’t have much of a choice except to carefully nudge the eye along it’s track. It will probably make an ugly crackling noise during this time, and double check to make sure nothing’s broken. If you can see the motor that drives the eye, you can also use an AA battery and some wire, after finding the correction polarity, to drive the eye outwards. This mightn’t be a good idea while the motor is in-circuit though (still hooked up to the DVD Player’s “brain” so to speak), so I didn’t go into too much detail with this.

    If you still can’t see the eye, you might need to take the actual reader apart. Your experience will vary, with mine I didn’t have to take it apart, so you’re on your own here. A tip though: be very, very careful with the ribbon cables – just the slighest lateral force on them is enough to rip them.

    Now hopefully you can see the lens, and it’s time to give it a good cleaning. If you have a steady hand, I thoroughly recommend some strong Acetone to clean the lens with. Acetone is nice because it eats oil and everything else, but care must be taken to ensure you don’t put any of it anywhere except on the lens itself. If it touches plastic, it can misfigure it and cause a mechanical problem. If it lands on the ribbon cable, it can quite possibly eat the ribbon cable and ruin it’s ability to transmit a signal. Use extreme care!

    Your other choices are Isopropyl and some dollar-store lens cleaning fluid. I would use the Isopropyl first, but that’s just me – I have no real reason or thinking behind this. It’s cheaper, how’s that.

    Whatever you use, dip a Q-tip (cotton swab) into the fluid, then tap it on your pants, a piece of cloth or something else to make sure there’s no drips. Ideally, dip just the tip in, and hopefully the fluid will travel up the rest of the Q-tip through a fascinating process I believe is called Osmosis. You don’t want too much liquid on the swab anyway, but you definitely don’t want it to be dry.

    Now swab the lens carefully – one complete turn should be plenty. Resist the urge to use the dry end to mop up if the lens is glistening, I believe you can scratch the delicate surface and scatter the beam worse than dust would. If it’s still glistening, leave it to dry – Isopropyl and Acetone both are somewhat volatile and will evaporate quickly without your help. Leaving it a good five minutes or so should be plenty if you’re concerned.

    Once you’re convinced the lens is clean, take the player back to a TV and hook it up, dropping a disc in to see if it’ll play. It helps if you’re still near something to ground yourself on here, so you might want to bring a small TV to your work area. With any luck, the machine will play the disc perfectly. It shouldn’t realistically take any more than 5 seconds for the player to read the “Table of Contents” on the disc (for example, for the “DVD” light to light up). If you’re content with how things are going, button it up and call it a day.

    Help! It still won’t play!


    If your player is still dead (like mine), then it’s time to recalibrate and see if that helps. There are a few things you should know about blind-recalibration. Firstly, the method I describe here is not the correct way to do it – you need proper equipment and stuff to do it right. Second, it mightn’t be the problem to begin with. Third, it pisses off technicians if it wasn’t the problem, the machine malfunctioned due to some other problem, and you’ve twiddled with the adjustments to make their life harder.

    Suffice to say, you should only attempt this on a machine that – if unsuccessful – you are going to throw away. If you have a $900 american-made, progressive scan DVD player – take it to a professional and don’t fuck with it.

    Let’s go.

    Optical Calibration: DVD Player Repair

    Look on the PCB attached to the lens assembly. Hopefully, you can see it without taking the device any further apart. Some DVD players will have one pot, some two, and very rarely you will have three. To understand how to adjust these, a little background is in order. It should be noted, that this is basically how I theorize it works – it might be incorrect.

    The “eye” shoots a laser at a given wavelength (your DVD player will adjust the wavelength to read various “layers” of the disc, but this is unimportant for our understanding) at the disc. The disc then bounces the light back, or diffuses it, for a 1 or a 0 – I’m not sure which way around it is, but again, this is unimportant for the purposes of this text. Next, an eye “reads” the beam of light, and tries to decipher if it’s a 1 or a 0 bit.

    This is where we have a problem, because the DVD player needs to know how much light constitutes a one or a zero, and where to draw the line. That’s what the calibration is for – it’s a no-holds-barred discrimination point between one and zero, black and white, on and off. It’s the line in the sand.

    Sometimes, the line gets moved. The laser’s properties change. Maybe a component weakens, maybe the power supply weakens and the laser isn’t so strong. Whatever, if the line moves too far, the reader won’t be able to discern between ones and zeros, and you effectively are looking at a blank disc – from the binary point of view.

    So, we can adjust the reader and calibrate it again, by moving the tiny potentiometer(s) on the PCB. If you’re really lucky, your unit only has one. If it has two, hopefully they’re labeled (mine was, see blurry image above). What you’re looking for is the pot which discriminates DVD signal. My unit has two pots, one is labeled “DVD” and the other “CD” – so I’m golden. The unit still plays video CDs, so I know to leave the CD one alone.

    If you can, the easiest way to adjust it is while the drive is trying to read. I recommend a purpose-built plastic driver used for driving tiny adjustment pots, something with some bend in it. Push it into the pot, holding it very loosely so when the head moves the driver moves with it. Put a disc in the drive, and start rotating it back and forth tiny, tiny amounts. A little goes a long way here, ladies and gentlemen.

    If you luck out, the player will act like most I’ve ever messed with, and “flick” the disc in small short bursts of acceleration, followed by the disc decelerating during the periods the motor has no power. This means it hasn’t picked up a bit stream yet, so keep fiddling. With just a small amount of patience and a little bit of luck, you’ll hit the sweet spot and the disc will spin up quite fast, and quite possibly even start playing.

    You can either quit here, or try to find the two extremes where the unit stops being able to read the disc, and then aim for the “middle” of the adjustment. I quit as soon as the disc played, but it’s entirely up to you. The theory behind aiming for the middle is should it fall out of alignment again, you have a little bit to go before it’ll stop working. It’s your call.

    Hopefully, it works for you. It’s worked for me, several times, thats why only i have wrote this creation and today sharing this with you all :)

    How to install Perl Module using CPAN

    Install Perl Module using CPAN


    At times, we need to install Perl modules that are not found in the official repository of a distribution. In that case, we have to revert to using cpan. CPAN stands for Comprehensive Perl Archive Network. It is an archive of over 16,000 modules of software written in Perl, as well as documentation for it. This tutorial will show you how to install a module using CPAN.

    First we need to launch cpan. Type cpan in a terminal. If it is not already configured, then it will start to ask a series of questions. Just press Enter all the way until it asks for your location. Specify the location by entering the number for that location in the list shown. Then it will ask about your country, go ahead and type the number appropriate for your country. At the end you will see the cpan prompt like so


    cpan>

    To install a module, for example, Cache::Static, type the following at cpan prompt

    cpan>install Cache::Static

    It will ask you some questions, just press Enter to accept the defaults which almost always work. The module with all its dependencies will be downloaded, compiled and installed.

    When you get back the cpan prompt, the module is installed.
    Type quit to get out of cpan

    cpan>quit

    To confirm that the module is installed successfully, run this command

    perl -e "use Cache::Static"

    If you get no output, it means the module is installed successfully.

    If you see the error “/bin/sh: cc: command not found”, then gcc is not installed. Install it like this on Debian, Ubuntu

    aptitude install gcc

    On Red Hat, Centos, Fedore, the following will work

    yum install gcc

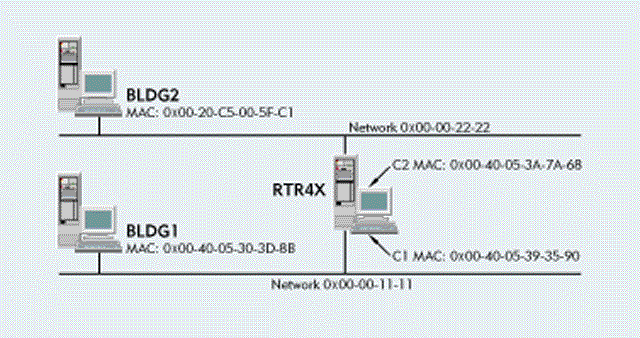
    Finding MAC addresses of all devices in LAN

    Finding MAC addresses of all devices in LAN

    As simple my last creation How to share a directory using nfs my todays creation How to find MAC addresses of all devices in LAN is also very usefull and simple. Actually its just a sharing ;)

    Recently I had to find mac addresses of all servers in the local area network (LAN) for preseeding Debian installations using PXE (I will soon write about it). Finding them is easy with nmap

    I used the following command and I had the mac addresses along with their associated IPs of all devices in the LAN. To find mac addresses, nmap must be run as root

    nmap -sP 192.168.2.*
    Starting Nmap 4.11 ( http://www.insecure.org/nmap/ ) at 2010-03-31 12:39 EDT
    Host 192.168.2.1 appears to be up.
    MAC Address: 00:02:B3:40:E0:AA (Intel)
    Host 192.168.2.2 appears to be up.
    MAC Address: 00:02:B3:40:E0:A5 (Intel)
    Host 192.168.2.3 appears to be up.
    MAC Address: 00:02:B3:40:E0:A5 (Intel)
    Host 192.168.2.11 appears to be up.
    MAC Address: 00:1B:2F:6B:B7:AC (Unknown)
    Host 192.168.2.34 appears to be up.
    MAC Address: 00:1F:C6:C9:A7:54 (Unknown)
    Host 192.168.2.39 appears to be up.
    MAC Address: 00:17:A4:93:59:EF (Global Data Services)
    Host 192.168.2.50 appears to be up.
    MAC Address: 00:1E:8C:04:A5:1F (Unknown)
    Host 192.168.2.57 appears to be up.
    MAC Address: 00:05:5D:E0:32:DF (D-Link Systems)
    Host 192.168.2.71 appears to be up.
    MAC Address: 00:03:47:A9:F3:D1 (Intel)
    Host 192.168.2.79 appears to be up.
    MAC Address: 00:1C:C0:9D:7F:9D (Unknown)
    Host 192.168.2.80 appears to be up.
    MAC Address: 00:1C:C0:9D:7D:51 (Unknown)
    Host 192.168.2.82 appears to be up.
    MAC Address: 00:15:58:32:5C:F4 (Foxconn)
    …..

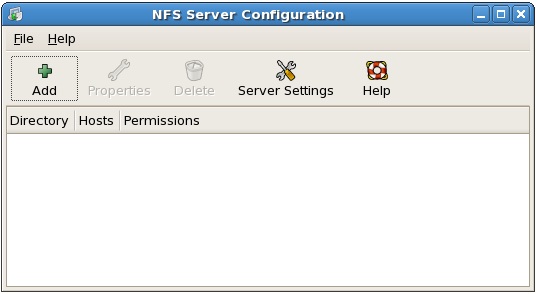
    How to share a directory using nfs


    Share directory using nfs

    This creation will walk you through exporting a directory so that we can read from or write to it. I will make it really simple so that in emergency situations, you are good to go within a few minutes

    First install nfs server (I am on Debian 5.0, other distributions would have a the nfs package name similar to that)

    aptitude install aptitude install nfs-kernel-server

    After we have the nfs server installed, you need to export the directory by using the /etc/exports file. The format of the file is:

    dir_to_be_exported allowed_hosts(options)

    I am just about to export my home dir and allowing only 192.168.2.10 to mount it, so in /etc/exports, I would the following:

    /home/linuxgravity 192.168.2.10(rw,sync,no_subtree_check)

    That’s it. That was so easy, isn’t it.

    Restart nfs server:

    /etc/init.d/nfs-kernel-server restart

    Now it is time for us to mount the shared (exported) directory to mount it on an empty directory. So while in the 192.168.2.10, first we would create a directory

    mkdir /home/remote_home

    Now just mount it with the following magically command:

    mount 192.168.2.2:/home/linuxgravity /home/remote_home

    As you have already figured out, the format is mount nfs_server_ip:exported_dir mount_point

    And now you can just read from/write to /home/remote_home easily.

    The whole process takes only less than two minutes ;)

    ssh passwordless authentication without keys

    ssh passwordless authentication without keys

    Imagine ever wanted to avoid the hassle of typing in the password while connecting to servers using ssh? Here is a really simply neat trick that will demonstrate how easy it is to accomplish it so it does not ask for password. And as a bonus, you will notice that the connection is surprisingly much faster than you originally thought. No, it is not about ssh keys.

    Suppose you could control the master which would permit you to enter the door without a key and the path it takes is always the right hand path. While you are thinking about it and saying to yourself what it has to do with ssh, allow me to tell you that you will realize once you have read the whole article how it is going to help you a lot in understanding passwordless authentication using this method.

    The first thing we need is simply two lines in .ssh/config inside your home directory. If the file is not there, just create it. So the two magic lines are:

    ControlMaster auto
    ControlPath ~/.ssh/master-%r@%h:%p

    Now connect to any host and it will ask for password. What the heck? It still asks for password, I heard you saying. That’s alright. Just put in the correct password and leave that terminal open. Open another terminal and try to connect to the same host again as in the first terminal and voila the magic…

    While you are thinking about how just two key words ControlMaster and ControlPath allowed you to connect to a host without password and also much faster, let me throw in another neat trick.

    If you ever wanted not to have to open another terminal, simply connect as shown below and the ssh will go into background

    ssh -N -f host


    Enjoy Vivek Creations :)

    How to Undo a Sent Email in Gmail


    Gmail is one of the biggest email service provider of Google. It gives you a vast memory of storage of above 7.49 GB during the time of writing this post. In mobiles we communicate via SMS for free of cost like wise in internet we send emails to communicate to others for free of cost. Basically every internet user owns his private email id. It’s natural that every human makes a mistake. But sending an email with mistakes might cause a problem anytime.

    So, Gmail has a feature of undoing a sent email. By oversight or unintentionally if you send an email you can undo it in Gmail and the email will be saved in drafts and can be corrected and resend it again or you can trash that email. Undo is sudden option which can only be used when you accidentally send an email to others by mistake.


    Steps to Undo a Sent Email in Gmail

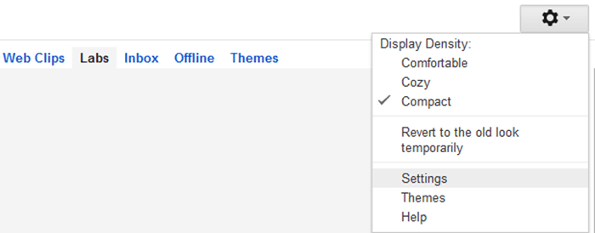
    1. Log in to your Gmail account. Now click on settings icon which you can find in left top bar. If not go to mail settings in old user interface and then you can find settings in that menu.

    Undo a Sent Email in Gmail

    2. Now in settings menu you can see the ‘Labs’ option click on it. Now you will find a normal search bar where you can type anything you want in that search bar.

    Undo a Sent Email in Gmail

    3. Now make a simple search for “Undo Send” extension in labs. You will find a cool Gmail Beta Plugin which helps in you in undoing a sent email by mistake in Gmail, now as soon as you Enable it and click on Save your Mail settings. Refresh your page otherwise Gmail will automatically load again so that plugin could start working in your account.

    Undo a Sent Email in Gmail

    4. Now just refresh the page of Gmail to see that Gmail Beta plugin in action.

    5. Now you can try once by sending an email to anyone. Go to compose email or just click on any email and select the reply option in that email. Fill the spaces you want to send email and then click on Send, now you will see email sent and you will find a small Undo Option besides it to get that email back, click that and you email will be backed up in Drafts for future use. You can edit that email and resend it or you can trash that email if you don’t want it for further use.

    Undo a Sent Email in Gmail

    This feature has been introduced in Gmail since long time but yet many are still unaware of this. Don’t forget to reload the page or refresh your Gmail account once after enabling this. So, now you are not lagging behind with any new Gmail features. Now there is no word of mistake in your Gmail history.


    How to Send mails from command line

    Send mails from command line

    Often times, we want to send log files or other emails from command line or want to script them. In this tutorial, I will show you how to do that using two mail clients mail and mutt.

    Sending mails using mail:

    mail (mailx is the newer version) is a fantastic program that can be used for sending email from command line or from within scripts.


    The following example will send an email to admin@example.com, with subject “Apache is down” and text “Please check Apache at host name of the server”

    echo “Please check Apache at `hostname`” | mail -s “Apache is down” admin@example.com


    We can cat the contents of any text file, for example, log file and it will be sent to the recipient specified

    cat “/var/log/apache2/error.log” | mail -s “Apache is down” admin@example.com

    To attach a file, other than a text one, we need to uuencode (unix to unix encode) it before sending

    uuencode banner.jpg banner_out.jpg | mail webmaster@example.com

    The banner.jpg is the name of input file and banner_out.jpg is the output uuencoded file that we will be sent by mail.

    To have text sent alogwith the attachment, we can cat or echo that text too

    (cat /var/log/apache2/error.log;uuencode banner.jpg banner.jpg) | mail -s pic webmaster@example.com


    Sending mails from using mutt:

    With mutt, its same as using mail.

    echo “Please check Apache at `hostname`” | mutt -s “Apache is down” admin@example.com

    or we can cat the contents of a text file to show as body text

    cat /var/log/apache2/error.log | mutt -s “Apache is down” admin@example.com

    OR

    mutt -s “Apache is down” admin@example.com

    To send an empty body mail, use an empty line as the mail body:

    echo | mutt -s “Software upgrades for `hostname`” admin@example.com

    To attach a binary file, its even easier with mutt, just use the -a option

    echo | mutt -s “New logo for the company” -a logo.gif webmaster@example.com

    Hope you this creation added to your knowledge.


    Delete any Facebook profile in 24 hours | Full tutorial

    Delete Facebook profile

    Actually this is not a hacking tutorial. Its only a trick by which you can delete the facebook profile of anyone. Yeah anyone ;)
    This is my creation about the facebook security, so how it works what we need and how to do this ? Let me explain you in detail. If you want any help or suggestion then you can submit it in comments thanks for reading this tutorial of vivek creations Read more interesting post about Facebook here.
    So, lets do it in some steps.

    Step 1 : 


    https://www.facebook.com/help/contact.php?show_form=memorialize_special_requests

    Click Here first
    This is the Url we will use to Report our slave. This Form allows you to report a deceased person (someone who is dead).


    Step 2 : 


    Complete the Fields: 
    Explain: Full Name: Your Victims Full name(Name last name)

    Date of birth: Go at his profile and click at Info tab and get his date of birth.

    Account Email Addresses: Do the same thing, go to his profile and click on info tab and get his email addresses.

    Networks: Again,go to his profile and click on Info tab and get his networks, copy them and paste in the form.

    Web address of profile you would like to report: Just go to his profile and copy the link in the address bar.

    Relationship to this person: To make more believable select Immediate Family.

    Requested Action: Remove Profile Proof Of Death: This is the hardest part of this form. 
    Now to make a proof of a death just Google in your language a "Death Certificate" or "Certificate of a Death". 
    It doesn't matters from what country you are, Download any death certificate and edit it with the help of photoshop.
    Save your image to desktop and upload it in one of the Image Free Hosting like: http://imageshack.us 
    And it's done.


    Yeah that is only the trick and that is only the creation. Think Think! Wink Wink ;) ;)


    Now,


    Additional Information: Write what you want, just write that you are in his/her family and you would like to close his/her Facebook account because you won't like that when he is dead, his Facebook is opened.
    Attachment includes the note and its objects.


    Finally Submit and wait for 24 hours. Please don't misuse my creation. Its only a service of facebook.
    Thanks for a visitor of my creations.
    If you want updates of our site than you can subscribe yourself through email. Just take a look on Right top of my site.


    Read Also:

    How to convert a Facebook profile to a Page

    Mask My IP 2.2.5.6 | Full version Free Download

    Mask My IP 2.2.5.6
    Mask My IP 2.2.5.6 | 5.3 Mb

    When you connect to a network, your computer has a unique identification IP-address as your home address, alerting everyone who you are and where you are. When you visit online stores, or send an e-mail, your IP address associated with this activity, and it identifies you personally. Hackers who steal personal data can get into your computer, monitor your activities, to steal your personal information. Mask My IP program will help to solve this problem. 
    Key Features: 
    - Hide Real IP Address 
    - Surf Anonymously 
    - Block ISP Eavesdropping 
    - Guard Against Hackers 
    - Prevent Identity Theft & Credit Card Fraud 
    - Protect All Connections Including Wi-Fi 
    - Defend in the Forum once be banned 
    - Send Anonymous Emails 
    - Easy & Effective 
    - Auto / Manual IP Changing 
    - 100% Clean & Safe 
    - Compatible With A lot

    Home Page - http://www.mask-myip.com/
    Setup
    +
    Crack
    Mediafire
    4shared
    2shared