Showing posts with label Computer Security. Show all posts

Thursday 9 August 2012

Best 10 Free Screen Recording Softwares For Creating Screencasts


Mostly tutorials which are some hard to understand or complicated in writing skip by the peoples, because of text tutorials only. But if we create a proper video by capturing our computer/laptop screen and upload the video with the tutorial, then it will become more comfortable to your visitors. We can describe anything which we perform on our computer to anyone by just making a proper video of our actions. 
We use screencasting (screen recording) for making the video of our various tasks performed by us on our computer. By screen recording we can better describe/demonstrate our tutorial which is some how related to computer products or services. And by our screencasted video we can spread our tutorial in easy and fast way.
Today, I am going to share some great collection of screencasting (screen recording) software which are free to use and easy to handle. Here are the 10 best screen recording software.

CamStudio

CamStudio
CamStudio is an open source screen recorder software which can record every screen and audio activity on a computer & create industry-standard AVI video files or bandwidth-friendly Streaming Flash videos (SWF).
Operating system support: Windows

Jing

Jing Screen Recorder
Jing can both take screenshots & capture a screen as videos. It is possible to add textboxes, arrows or rectangles to highlight spots.
It can send the generated outputs to Screencast.com, Flickr, a FTP account, Twitter & more.
With a microphone, you can record audio with the video as well.
Operating system support: Windows, Mac OS X

Webineria

Webineria - Free Screen Capture
This is a very easy-to-use open source software to create screencasts.
It records the screen as an .AVI file & offers an option to create .FLV file from it. With the help of hotkeys, it is possible to start-pause & stop recording.
A great feature is, it can combine another video input (like webcam) with thescreen recording process.
Operating system support: Windows

Wink

Wink
Wink is a tutorial and presentation creation software which can capture screenshots & enables you to add explanation boxes, buttons, titles & more.
It supports various output formats like .EXE, .FLV, .HTML, etc.
Operating system support: Windows, Linux

UltraVNC Screen Recorder

UltraVNC Screen Recorder
UltraVNC Screen Recorder is based-on CamStudio source with updates to improve the performance.
It supports both audio & screen capturing.
Operating system support: Windows

Windows Media Encoder

Windows Media Encoder
Windows Media Encoder is a powerful application for capturing audio and video content with high-quality multichannel sound, high-definition video quality, and support for mixed-mode voice and music content.
Operating system support: Windows

BB FlashBack Express

BB FlashBack Express
BB FlashBack Express is the free version of some other advanced series. It can record from a video source, screen & audio.
It can export to AVI or FLV & has integrated support for direct uploading to the popular video sharing websites.
Operating system support: Windows

CaptureFox (Firefox add-on)

Firefox Screen Capture
CaptureFox is a Firefox add-on which can record screens frame-by-frame to create tutorials. It also supports audio recording.
Operating system support: All major operating systems

uTIPu TipCam

TipCam
TipCam, besides the standard screen recording with audio & video, has various features like:
  • has AVI & FLV support
  • audio can be re-recorderd
  • beginning & end parts can be trimmed
  • video can zoom to the mouse cursor with smart zooming
  • ability to draw free-style during recording
Operating system support: Windows

Krut

Krut Screen Recorder
This is a tiny Java application (works on many platforms) for creating screencasts.
Krut records movie files of selected parts of your screen in the quicktime mov format, including sound. The program has an intuitive and compact user interface.
Operating system support: All major operating systems

Tuesday 31 July 2012

How to increase Processor Speed


There are many steps to increase your processor speed or system performance.
This post is for those people who are having problem with Processor speed. Follow the below steps carefully..
If you are using Microsoft Windows xp,then your processor speed may slow down.Why because Windows Xp carries extraordinary large list of unusual,visual sound effects,menu shadows,high resolution, quality color,fade effects and many.These features may slow down your Processor speed.


By decreasing your Xp resources,your Processor speed may definitely increase.


Firstly disable all the settings in Start up mode.
this can be done by following instructions :

1)Go to “Run”.
2)type “msconfig” in run.
3)Go to Start up.
4)Disable all startup items except Antivirus.

Prefetch files:-


delete all prefetch files.
1)go to run.
2)type prefetch.
3)delete all files.

If you are not having any with work with resolution better you restart your system in Safe Mode.This can be done by continuously by clicking F8 key more than 5times as soon as restart your system. Then a page will open with many options.Choose “Safe Mode“.If you want to do any Networking then choose
“Safe Mode with Networking“.

These two options may remove all your display,resolution,bit size settings etc.
But increase your system speed.

Visual effects:-

1)Right click on “My Computer” >Go to System proporties>Go to Advanced Settings
2)Then click on the Setting in Performance then choose the option”Adjust for best appearance”or you
can choose”custom”.

These options many decrease your system visual effects but increase your system performance.

Automatic updates:-

Even though your system is geniune better to turn off your Automatic updates.There are many reasons
which slow down your processor speed if you turn on Automatic updates.few reasons are:-

1)Most of your RAM speed is used by Xp Operating System.If the resources of your XP is increased then Operating
System may slow down.It indirectly effects the processor speed.
2)If your click on Live Up dates then there may be chances of Virus entering in your system.which leads your
processor speed slow.

Defragmentation:-
This is the major step which increases your Processor speed.
Steps to perform Defragmentation
1)Go to my computer.
2)Right click on C drive. Click on proporties.
3)Choose the option Defragment now.

Removing virus:-
Virus such as Trojan,vorm.exe,sass.exe etc which slow down your processor speed.So download any good antivirus software such as Norton,Spyware terminator,Kaspersky etc.I would perfer Kaspersky it is a best antivirus software.Norton may slow down your system performance.

Few months ago i posted a topic on Internet speed.Several ways to increase Internet speed.
Increase your Bandwidth by 20% Windows uses 20% of your bandwidth! Get it back..

Sunday 15 July 2012

How to know who used your PC/Laptop in your absence

                                    How to know who used your PC/Laptop in your absence


Now easily find out, who used your PC/Laptop in your absence, without using any software.
Just follow these simple steps:

start >> run >>eventvwr.msc

Events are stored in three log files: Application, Security, and System.
These logs can be reviewed and archived.
For our purposes we want the System log. Click on "System" in the left-hand column for a list of events.
Look for a date and time when you weren't home and your computer should have been off.
Double click on the eg: info n it will show u the detail.
You can also use this log to see how long someone was on the computer. Just look at the time the computer was turned on and off for that day.

Sunday 18 March 2012

How to fix Windows Counterfeit Error


Start Windows Registry editor and delete the folder "WGALOGON" located in the following location:

HKEY_LOCAL_MACHINE\SOFTWARE\Microsoft\ Windows NT\CurrentVersion\WinlogonNotify.

Delete all references in your registry to WgaTray.exe

Another alternative suggest that three files are installed Windows XP System Folder:

\WINDOWS\system32\WgaLogon.dll
\WINDOWS\system32\WgaTray.exe
\WINDOWS\system32\LegitCheckControl.dll

The wgatray.exe process makes the check for genuine windows software. You can disable WGA by removing the execute bit on WgaLogon.dll. That way, winlogon can't call it as a notification package at boot, and since WgaLogon is responsible for running and maintaining WgaTray.exe, no more tray popups either.

To change the execute bit of WgaLogon.dll, first turn off Simple File Sharing.
Now right click the file in Windows Explorer and open the Security Tab. Hit the Advanced button, uncheck the Inherit box at the bottom, hit the Copy button, then hit OK. Go through each listed user/group and remove the "Read & Execute" permission for that file, leaving the "Read" permission as-is.

Hit OK to apply the permission changes and close the file properties dialog. Restart the machine. You can now turn "Use simple file sharing" back on, if you want.

A third alternative posted on the internet suggest that users clear the content of file data.dat located in the following directory:
C:\Documents and Settings\All Users\Application Data\Windows Genuine Advantage\data

Save the data.dat empty file and change the attributes to "Read Only" - Restart you computer.
Or start your PC in Safe Mode and delete the following files from Windows system32 folder - wgalogon.dll spmgs.dll wgatray.exe The WGA setup file is in C:\WINDOWS\SoftwareDistribution\Download\6c4788c9549d437e76e1773a7639582

If you don't use "Fast User Switching", you can disable the Windows XP Welcome Screen if you are logged in as an Administrator. This will remove the initial WGA Warning Screen:

1. Click on Start -> Control Panel ->User Accounts
2. Click on "Change the way users log on or off"
3. Uncheck "Use the Welcome Screen" - Choose Apply
4. Close the User Accounts window and the Control Panel
5. The next time you reboot your computer, the classic login prompt will be used

To enable Fast User Switching, you must also enable the Use the Welcome screen option. Also, Fast User Switching cannot be used when Offline Files are enabled.

Disable wgatray.exe - Some users are claiming that removing the WGATray.exe (or killing the WGATray.exe process) are working for them.

None of these methods are guaranteed to work and people are just experimenting. Meanwhile Microsoft is not willing to relent to crackers this time and are planning to release an update of WGADiag2.exe utility in the next few days.

WGADiag2 will also fix the problem with registry key permissions may cause the installation of Windows Genuine Advantage Notifications KB905474 to fail from Windows Update:

Here's a manual fix provided by Microsoft. These permissions can be repaired using Registry Editor as follows:

1. Click Start, and then click Run
2. In the Open box, type regedit, and then click OK
3. Expand HKEY_CLASSES_ROOT
4. Locate the subkey HKEY_CLASSES_ROOT\LegitCheckControl.Legi…
5. Right-click the subkey and select Permissions….
6. Ensure that Administrators allowed Full Control permission
7. Repeat steps 3-6 for the subkey
HKEY_CLASSES_ROOT\LegitCheckControl.Le…

Microsoft has also published a kB article if the Windows Genuine Advantage (WGA) validation check process does not validate successfully on a Microsoft Windows XP-based computer, and you receive one or both of the following error messages:

Product Key Inaccessible 0x80080212

This problem occurs when you do not have the appropriate permissions for the Windows Genuine Advantage\Data folder. In the Permissions for Users section, make sure that Read & Execute, List Folder Contents and Read permissions are given. If the previous steps fail, start the computer in Safe Mode and rename the %allusersprofile%\Application Data\Windows Genuine Advantage directory.

Sunday 4 March 2012

Don't Get Caught! How to Protect Your Hard Drives from Data Forensics


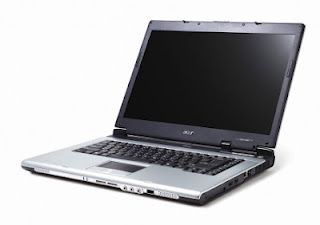
Over the past few days, a lot of questions have been posed to me about removing sensitive data from hard drives. Ideas seem to range from magnets to microwaves and a lot of things in-between. So, I'd like to explain a little bit about data forensics, how it works, and the steps you can take to be safe.

Often, an anon will delete files from his computer, but that is only half the story, as those files are still really there. And if the careless anon doesn't take steps to fix that, when his door gets kicked in and the FBI takes his hard drive, they will be able to see everything. Don't be that anon.

What Is Computer Forensics? The People on 'CSI'?

Computer forensics is the collection, preservation, analysis and presentation of computer-related evidence. In summary, it helps determine the who, what, where, and when related to a computer-based crime or violation. When the feds are finished arresting you and boxing up your belongings into evidence crates, they will ship them off to the FBI data lab in Washington, D.C.


In addition, an examiner will work to uncover all files on the subject's system. This includes existing active, invisible, deleted, hidden, password-protected, and encrypted files. In many cases, information is gathered during a computer forensics investigation that is not typically available or viewable by the average computer user, such as fragments of data that can be found in the space allocated for existing files (known as “slack space”). Special skills and tools are needed to obtain this type of information or evidence.


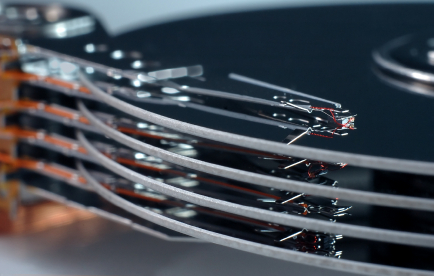
An expert can recover pretty much all of your deleted files, along with other data that has not yet been overwritten. As a computer is used, the operating system is constantly writing data to the hard drive. From time to time, the OS will save new data on a hard drive by overwriting data that exists on the drive, but is no longer needed by the operating system, i.e. a deleted file.  So, the ongoing use of a computer system may destroy data that could have been extracted before being overwritten.

How to Protect Yourself

While erasing files simply marks file space as available for reuse, data-wiping overwrites all data space on a storage device, replacing useful data with garbage data. Depending upon the method used, the overwrite data could be zeros (also known as "zero-fill") or could be various random patterns. This is why simply deleting information is never enough. You must take proactive steps to ensure your removal is complete.

We are going to use a great boot disk called DBAN to perform this operation.

Step 1

Obtain and Burn DBAN

You can download the 2.2.6 Beta release from Sourceforge. Once you have the .ISO, all that's left to do is burn it to a blank CD/DVD. Place the media into your drive and restart the computer. Most computers are set to try and boot from the CD drive before the hard disk. If this is not the case, and your computer does not boot the CD drive, you will need to enter your BIOS setup and change the boot priority order.

Step 2

Boot and Run!

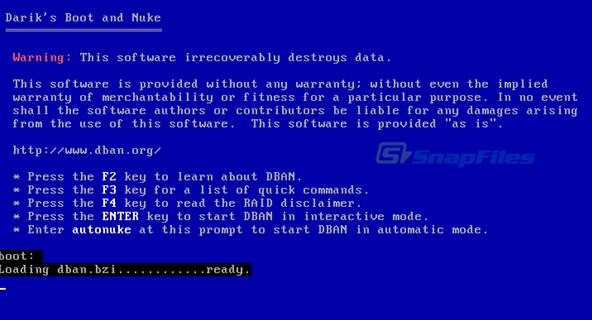
After the CD starts, you will be greeted with this screen:


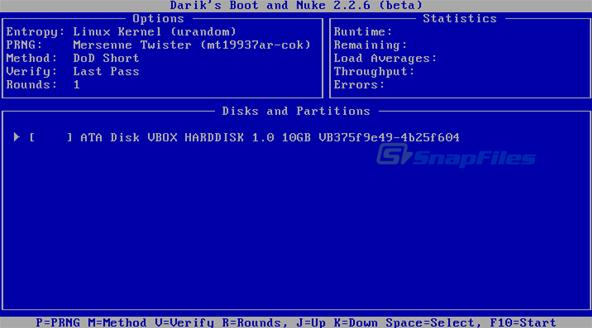
We want to simply press enter here to start DBAN in interactive mode. The main menu shown below should display your hard drive to be wiped.


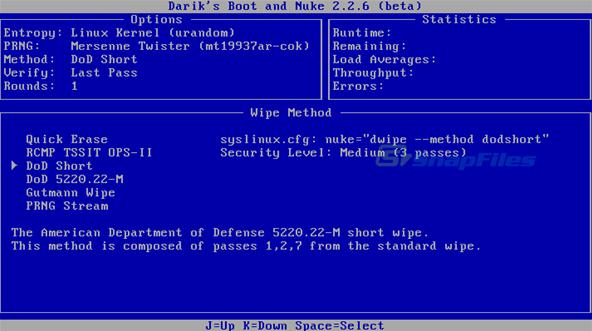
The next screen shows us DBAN is ready to get down to work, the default method is a DoD Short wipe, and it will work fine for us.


Hit the space bar to select and it will start. Be warned though, the DoD wipe takes a bit of time, especially on larger hard drives. But not as long as a prison sentence would be.

In Closing

DBAM is a great tool to clean a hard drive. I carry a copy of it in my laptop bag when I travel and you should do the same. It is quick and easy and works better then most other tools I have used. Be careful as (obviously) it is impossible to recover if you zap the wrong hard drive!


Saturday 3 March 2012

How to stop email spam on Gmail

One of the most compelling reasons to use Gmail is to avoid excessive amounts of spam email. Gmail uses innovative technology and community reporting to recognize and automatically filter out spam emails. However, even the most advanced spam filters are not 100 percent effective, and some spam will eventually trickle through the system. To minimize your spam exposure, you can report the spam using Gmail's reporting system and alter your email usage to further protect your email address.

how to stop email spam

Here i am giving you some steps on How to stop email spam.

Modifying Your Email Address for Filtering

Step 1
Modify your own Gmail address with periods (".") within your username, such as transforming "myemailaddress@gmail.com" to "my.email.address@gmail.com." Gmail will read it as the same email address.

Step 2
Extend your email's username with pluses ("+"), followed by a keyword, such as changing "myemailaddress@gmail.com" to "myemailaddress+possiblespam@gmail.com." Gmail will still recognize the email address as yours and deliver it to you.

Step 3
Use "googlemail.com" domain instead of "gmail.com," such as changing "myemailaddress@gmail.com" to "myemailaddress@googlemail.com." This is the old Google domain, but still functions as if you used the current domain.

Step 4
Use these modified email addresses when entering your email on websites. This gives you the ability to filter them, should they become targeted by spam.

Filtering Modified Emails

Step 1
Click "Create a filter" at the top of the Gmail window, to the right of the search bar.

Step 2
Enter the modified email address in the "To" field, and click "Next."

Step 3
Select the appropriate action, such as marking the message read, sending it straight into the archive, applying an identifiable label or deleting it. Click "Create Filter" to create the filter.

Step 4
Create additional filters for each modified email address.

Filtering Specific Emails

Step 1
Select the email you want to filter.

Step 2
Click "More actions" and choose "Filter messages like these." The "From" email address is automatically filled.

Step 3
Modify any other filter criteria you desire, such as subject lines or keywords, and click "Next."

Step 4
Select the action, such as deleting it, applying a label or sending it straight into Archives.

Step 5
Click "Create Filter" to apply the new filter.


Tips & Warnings on how to stop email spam

  • Select any spam messages and click "Report spam" on the top menu to move the message to the spam folder. This also marks the sender as a spam sender, which usually stops subsequent messages and helps Gmail identify spam email to help the Gmail community as a whole.
  • Consider creating a completely separate email account for signing up with websites. As an example, some sites may require you to enter you email address to set up an account or grant access. However, you may not want to receive email from this site, so you could give them the "junk" email address. If they start sending spam, it only goes to this junk email address.